2008 Mar 25, 11:05A trunk with a button. When you push the button the trunk opens, a robotic arm comes out and pushes the button again to turn itself off.
 via:ethan_t_hein art robot trunk machine humor
 2007 Nov 28, 1:23One of the new Zune features that had me the most excited was the claimed improved Windows Media Center integration which unfortunately turned out to simply mean support for the Win MCE video format
(
with an exception for HD). I wanted to be able to pick shows recorded by my Win MCE and have the Zune automatically sync up the
latest episodes. However, with the improved podcast support in the Zune software one can easily create a ridiculous hack to accomplish this.
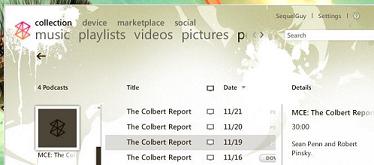
The new Zune software has podcast support which does everything I'd want to do with a
Win MCE recorded TV series so the goal is to shoehorn a TV series into a Zune podcast. An overview of the steps: Create an XSLT that converts Win MCE data to a podcast, run the XSLT as a scheduled
task every few hours per TV series, setup a Web server pointed at the resulting podcasts and the Win MCE Recorded TV directory, and subscribe to the resulting podcasts in the Zune software.
- Reading through the Win MCE data stored as an XML file in "C:\ProgramData\Microsoft\eHome\Recording\Recordings.xml" and the spec for podcasts I created an XSLT to convert a series from Win MCE data to a podcast.
- I added a new task to the Scheduled Tasks to run my XSLT using my xsltproc.js script. The task runs a handful of commands that look something like the following:
C:\windows\system32\wscript.exe C:\users\dave\bin\xsltproc.js C:\Users\Dave\Documents\trunk\development\mce-zune\mce-to-podcast.xslt
      C:\ProgramData\Microsoft\eHome\Recording\Recordings.xml --param title "The Daily Show With Jon Stewart" --param max 4 --param baseURI "http://groucho/" --param thisRelURI "tds.xml" -o
      "D:\recorded tv\tds.xml"
For each TV series I run a command like the above and that outputs a podcast for that series into my "D:\Recorded TV\" directory.
- Zune only allows http URIs for its podcasts so I installed a web server on my Win MCE server. I'm running Vista Ultimate so it was quick and easy for me to install IIS7 but any Web server will do. Then I pointed it at "D:\Recorded TV\".
- Once all the above was done I just subscribed to the resulting podcasts via my Web server and viola! Since I'm forced to use a Web server I can even run the Zune software on a machine other
than my Win MCE server. You can see a screen-shot above of my Zune software showing my Colbert Report podcast.
technical xml mce hack windows media center zune windows xslt podcast 2007 Jul 13, 8:30I bought an external backup drive a few weekends ago. I've previously setup a
Subversion repository so I decided to move everything into the repository and
then back it up. So in went the contents of all of my %USERPROFILE% and ~ directories with a bit of sorting and pruning. Not too much though given its much easier to dump in everything and search for
what I want then to take the time to examine and grade each file. What follows are the notes I took while setting this up. It takes me a bit of time to look up the help on each command so I figure
I'll write it all down here for the benefit of myself and potentially others...
Setting Up the Backup Drive For Linux
I first changed the filesystem on the drive to ext3. I plugged it into my USB2.0 port and ran fdisk:
sudo fdisk /dev/sda
Useful commands I used to do this follow mostly in order:
-
m
-
help
-
p
-
print current partitions
-
d
-
delete current partition
-
n
-
create new partition (I used the defaults)
-
w
-
write changes and exit
Then I formatted for ext3.
sudo mkfs.ext3 /dev/sda1
I made it easy to mount:
sudo vim /etc/fstab

  # added line to end:

  /dev/sda1 /media/backup ext3 rw,user,noauto 0 0
I setup the directory structure on the disk
mount /media/backup

  sudo mkdir /media/backup/users

  sudo mkdir /media/backup/users/dave

  sudo chown dave:dave /media/backup/users/dave
After all that its easy to make a copy of the Subversion repository:
mount /media/backup

  cp -Rv /home/dave/svn /media/backup/users/dave/

  umount /media/backup
Next on the agenda is to add a cron job to do this regularly.
Subversion Command Reference
On a machine that has local access to the Subversion repository you can check out a specific subdirectory as follows using the file scheme:
svn co file:///home/dave/svn/trunk/web/dave%40deletethis.net/public_html
Note also that although one of my directories is named 'dave@deletethis.net' Subversion requires the '@' to be percent-encoded.
Other useful subversion commands:
-
svn help
-
help
-
svn list file:///home/dave/svn/
-
list all files in root dir of svn depot
-
svn list -R file:///home/dave/svn/
-
list all files in svn depot
-
svn list -R file:///home/dave/svn/ | grep \/$
-
list all directories
-
svn status
-
List status of all files in the working copy directory as in - modified, not in repository, etc
-
svn update
-
Brings the working copy up to date wrt the repository
-
svn commit
-
Commit changes from the working copy to the repository
-
svn add / move / delete
-
Perform the specified action -- occurs immediately
Setting up Windows Client for Auto Auth into SVN
When using an SVN client on Windows via svn+ssh its useful to have the Windows automatically generate connections to the SVN server. I use
putty on my Windows machines so I read the directions on
using public keys with putty.
putty.exe dave@deletethis.net

  cd .ssh

  vim authorized_keys # leave the putty window open for now

  puttygen.exe

  Click the 'generate' button

  Move the mouse around until finished

  Copy text in 'Public key for pasting into OpenSSH authorized_keys file:' to putty window & save & close putty window

  Enter Key passphrase & Comment in puttygen

  Save the private key somewhere private

  pageant.exe

  'Add Key' the private key just saved.
Checking out using Tortoise SVN
On one of my Windows machines I've already installed Tortoise SVN. Checking out from my SVN repository was really easy. I just right clicked in Explorer in a directory and selected "SVN Checkout...".
Then in the following dialog I entered the svn URI:
svn+ssh://dave@deletethis.net/home/dave/svn/trunk/web/dave%40deletethis.net/public_html/
Note again that the '@' that is part of the directory name is percent-encoded as '%40' while the '@' in the userinfo is not.
Windows Command Line Check Out
On my media center I didn't want to install Tortoise SVN so rather I used the
command line tool. I setup pageant like before the only
difficulty was getting the SVN command line tool to use putty. With the default configuration you can use the SVN_SSH environment variable to point at a compliant SSH command line tool. The trick is
that its interpreted as a backslash escaped string. So I set mine thusly:
set SVN_SSH=C:\\users\\dave\\bin\\putty\\plink.exe
The escaping solved the vague error I received about not being able to create the tunnel.
backup technical personal windows svn linux subversion 


 Some rights reserved